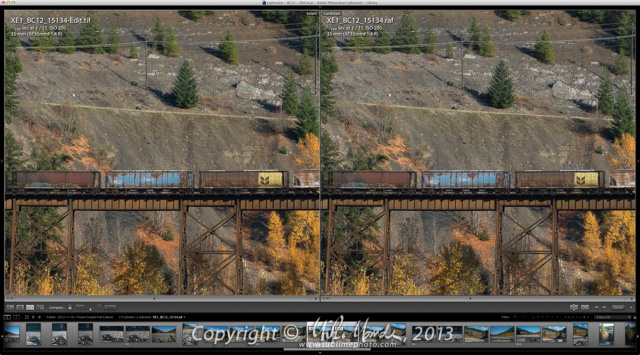
(Above, the left side shows the old conversion and the right side, the new)
Open full image: LR44_train_full.jpg
Open full image: LR44_train_full.jpg
Yesterday, Adobe posted release candidate updates to Lightroom (4.4 RC) and Camera Raw (7.4 beta) on the Adobe Labs website. One of the key improvements, apart from some solid bug fixes and new camera support, is an update to their Fujifilm X-Trans raw conversion code. In their words: "...a correction to the demosaic algorithms for Fujifilm cameras with the X-Trans sensor." Well, the word "correction" doesn't do justice to all the improvements. Virtually all of the complaints I had about Adobe's X-Trans conversions have been addressed.
I have prepared some side-by-side comparisons of various images (Lightroom screenshots), converted with the previous Adobe X-Trans algorithm in Photoshop CS6 and ACR v7.3 (the left-side 100% crop), and Lightroom 4.4 RC (the right side 100% crop), which uses Adobe's new code. At 100% or 200% pixel-peeping zoom levels, the differences are clearly visible, if you know what to look for. Below each image is a link to open a 3000 pixel version of the full image in a new window, processed and output with the new Lightroom 4.4 release candidate. When you click on the side-by-side comparison screenshots, make sure you zoom to 100% on the window that opens to see the differences more clearly. Or save the shots to your computer and open them up in something other than your browser. The screenshots are from Lightroom sized to a 27" display, so they are 2556x1418 in size.
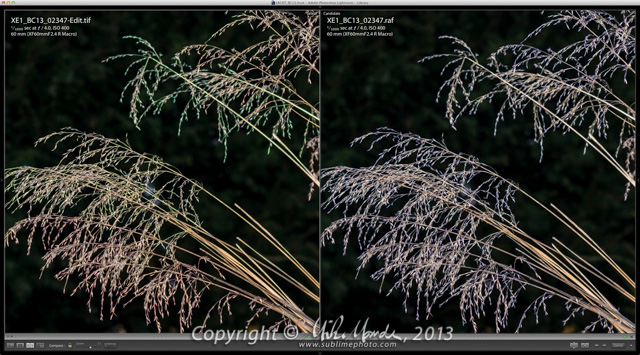
I have purposefully chosen images that look particularly bad, the worst ones I could find when viewed at 100% zoom, in order to illustrate the sometimes dramatic changes in this new update. In a few instances, the problems were serious enough that you could even see them in substantially downsized versions for the web, for example the "can" (compressed air can) image, the "railing" image and the "grass" image.
Note that the majority of my X-Trans shots don't show issues to the same extent as the samples in this blog posting and I was generally quite happy even with Adobe's previous X-Trans raw processing. I found that for 2400 pixel wide web images and 13x19 sized prints, it only happened occasionally that I felt Adobe's processing was bad enough to resort to the camera JPEG or to a different raw converter. Also note that even regular Bayer-pattern sensors can be subject to the occasional bit of demosaic artifacting, so what little remains now on X-Trans conversions seems to be pretty similar to what I would expect from any camera really.
I processed both sets of sample images with identical settings but one thing to remember is that the previous version of Adobe's software required distinctly different settings for sharpening in order to minimize the smoothing and artifacting that could happen with some photos. Therefore, the examples from ACR v7.3 are actually sub-optimal with the settings I used, however this does serve to illustrate just how much improvement has been achieved comparing the new to the old. With the previous version, one had to use a much larger radius of sharpening in order to minimize problems, however that was less than ideal for fine detail rendition but it worked well enough for moderately sized prints and web galleries, with rarely a problem. However now, the new processing allows one to take the radius back down to less than 1 pixel (I used sharpening settings of 45, 0.8, 100, 0 for these samples and virtually no noise reduction) so this greatly helps with the rendering, sharpness and natural look of fine details.
The last thing to note, before we dive into all the images, is that the side-by-side comparisons were all JPEG screenshots, opened in Lightroom, converted from the monitor colour-space to sRGB, watermarked and then uploaded. You may see some colour blotchiness due to double JPEG compression, but the main demosaic improvements will still be obvious. Ideally, I would have conbined different version of the files in Photoshop and then output those results, but frankly I was too lazy to do that! This all took long enough to do...
So, talking about the first sample at the top of this blog entry. It was shot up the Fraser Canyon and take a look at the foliage, the bridge detail and the rocks and gravel above the train. The previous version shows some weird swirly "fractal" patterns in the gravel slope and rocks, foliage is mushy and indistinct and the bridge structure looks weird and somehow artificial. However I had printed that shot and even on a 13x19, it looked perfectly fine with the previous version of Lightroom at anything approaching a normal print viewing distance. Even in the new version, there is some aliasing showing in the power-lines, an artifact of having a sharp lens and a sensor without an anti-aliasing filter. If I was to actually process this file properly, I'd actually lessen the sharpening selectively along the aliased power-line wires, or for that matter, even for the entire image a little. The 3000 pixel version will certainly be too sharp for some people's tastes...
Open full image: LR44_mtn_full.jpg
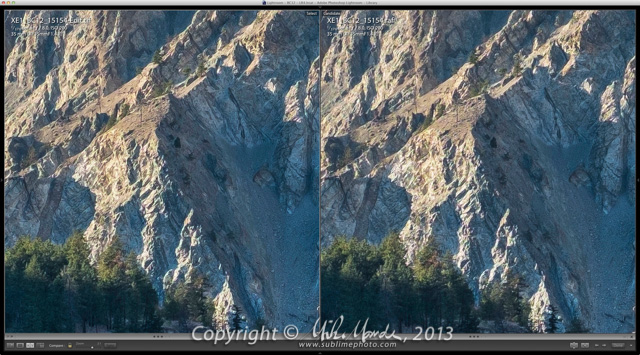
The next example above, is at 200% zoom, a tiny crop of a shot taken just north of Lytton, B.C. This sample really shows the odd, swirly, fractal looking patterns in the rocks and the sunlit trees on the lower left, almost as though the scene was computer generated instead of a photo. On the right side, with LR 4.4 RC, the detail rendering is far more natural looking. Again, even before, you had to blow the image up quite large to see the problems.
Open full image: LR44_river_full.jpg
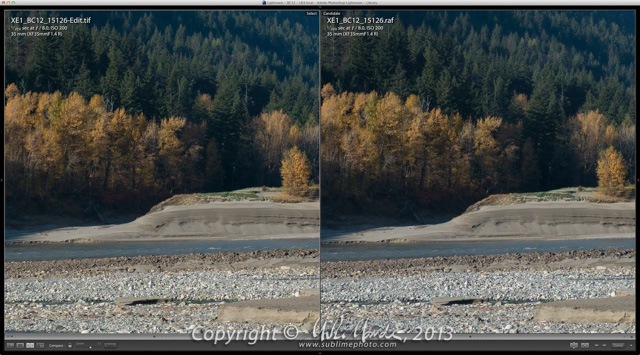
Above, check out the closer rocks, the sand bank, the grass in the sand and the trees. The new version is distinctly more natural looking with fewer swirly "fractal" artifacts.
Open full image: LR44_grass_full.jpg
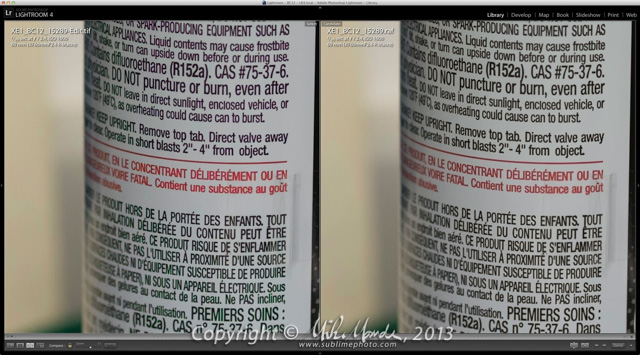
Open full image: LR44_can_full.jpg
The writing on the above canned air has horrible green and red colour bleed. Not only that, but even the entire text takes on a magenta cast in spots, rather than being neutral as it should be. I was just playing around with the macro lens on this one, but kept the shot due to the amazingly bad rendering of the text! Again, essentially no issues with the new version of Lightroom, although there is still a hint of red bleed in spots. However as mentioned near the beginning of this posting, I have seen some slight bleed like that on tight detail, even from regular Bayer-sensor images when examined at 100% zoom.
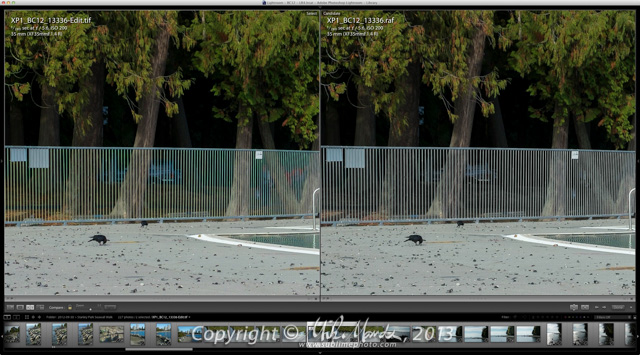
Open full image: LR44_railing_full.jpg
Here's another really bad one which shows issues on even a small web-sized image, shot on an X-Pro1 and not my X-E1. The railing has taken on the exaggerated colour of the objects behind it! Again, with the new version of Lightroom, the results are just as clean as the out of camera JPEG with no colour bleed. It's hard to tell, but perhaps too much background colour behind the railing has been removed in the raw processing now? In any case, the version on the right is perfectly useable and looks fine, but not so on the left!
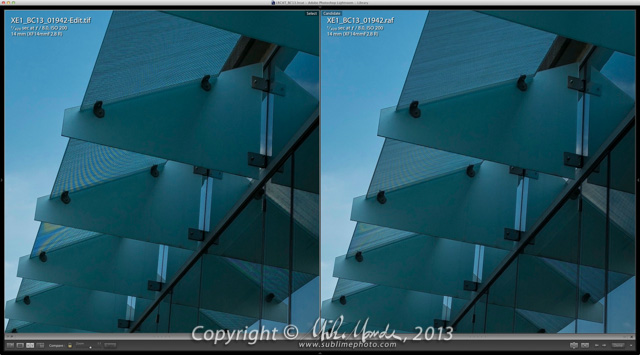
Open full image: LR44_moire_full.jpg
Lastly, despite the X-Trans sensor's inherent resistance to moiré, if you manage to get the frequency, sharpness and angle of a pattern just right, well see for yourself. The above shot with the XF 14mm lens, which is very sharp, illustrates this perfectly! The new version of Lightroom reduces, but does not eliminate the moiré here. Of course, had I used the moiré reduction brush, I could have completely gotten rid of all the false colour in this shot. Even the out-of-camera JPEG, in this case, shows some moiré, actually slightly more than the new version of Lightroom does.
So there you have it: major, amazing improvements in image processing of X-Trans raw files in the release candidate of Lightroom 4.4. I was certainly hoping for this degree of progress, but honestly was not really expecting it to be quite so dramatic. So far I have not found a single case where the out-of-camera JPEG was better, whereas in most of the above examples, the JPEG was much better than the previous Adobe raw conversion from a detail rendering standpoint.
If I had any complaint, it would be that opened-up shadows still look a little too smooth at times, lacking crisp texture detail, however this happens with Adobe raw conversions for other cameras too. You can see this in the shaded trees in the "mtn" image. I will sometimes take the adjustment brush, and paint in more sharpening and less noise reduction in the areas that I feel are overly smoothed looking, although I didn't do that for any of these samples. I wish Lightroom had some sort of separate "shadow smoothing" control where you could either increase or decrease this effect as desired.
I would say that overall, this is currently as good as it gets as far as X-Trans conversion quality and I am extremely happy with what I am seeing. Comparing it to Capture One Pro v7.02, I'd say that Adobe's conversions are slightly softer and require more aggressive sharpening, however at times Capture One can look a bit too "crunchy" for my liking with some weird, short, vertical and horizontal linear artifacts in spots with lots of complex detail. However at least it does not suffer from the same "Adobe shadow smoothing" that I mentioned above. Also on some images, colour bleed can still show a little more in Capture One and I've definitely seen cases where the camera JPEG (and the new Lightroom) is a little better yet. At low ISO, it would probably be difficult to decide which program does a better job in most cases, although I'd say that as you ramp up the ISO, Adobe would have the edge over Capture One Pro due to its seemingly more sophisticated noise control. Of course Capture One Pro does have some excellent workflow features and you might want to choose it simply for its awesome perspective correction controls, its multiple simultaneous output recipe feature, its superb selective colour corrections or the many other things that it does really well.
In any case, for all those firmly entrenched in an Adobe raw workflow, there are effectively no more issues to be concerned about and if you've been holding off buying an X-Trans equipped Fujifilm body because of that... well there's no need to anymore! Now, back to converting raw files and checking out previous work with Lightroom 4.4. Things are looking really good indeed...


0 comments:
Post a Comment