Saturday, December 12, 2015

Bookmark and Share

Gallery: Joshua Tree National Park, CA - Day 4 / 2010


Gallery (40 images): California 2010 / Day 4

After leaving Anza-Borrego in the morning, on the way north to Twentynine Palms I stopped at the side of the road a few times to photograph some nice patches of wildflowers. After a bit of grocery shopping, and a much needed shower, it was back into Joshua Tree National Park for an afternoon and evening of hiking around the park. Compared to Anza-Borrego, there was virtually nothing blooming in Joshua Tree yet, probably a bit too early in the year or perhaps there hadn't been enough rains further north? The last two photos in the gallery, one of which is the above image, really shows some of the park's vistas nicely, with the piles of huge weathered boulders and vast numbers of Joshua trees visible when you open the larger version of the images. There's something almost otherworldly to those views...

All posts from this trip: California 2010

Sunday, December 6, 2015

Bookmark and Share

Gallery: A Beautiful Sunday


Gallery (30 images): A Beautiful Sunday...

A week ago, we had a gorgeous weekend and I took advantage of what might have been the last nice weekend in a long while to go out and hike around near Alouette Lake and then later on, closer to sunset, by Pitt Lake. No lens tests, no reviews, just some photos on a beautiful, crisp, sunny fall day...

Friday, November 27, 2015

Bookmark and Share

Tested! Fujinon XF 35mm f/2R WR


Gallery (40 images): Tested! Fujinon XF 35mm f/2R WR

I recently received my own personal, brand new Fujinon XF 35mm f/2 lens, in silver of course, to match my silver X-E2. Actually, the combination looks rather retro and very nice to me, like an old Leica lens or even an old silver Hasselblad lens in miniature! The WR designation means it is resistant against moisture and dust ingress, joining the 16mm f/1.4 and 90mm f/2 lenses as the only primes with WR. How does it perform optically, you might be wondering? Well firstly, have a look at gallery of sample images by clicking on the above image, then continue reading below…


Suitably retro: the new silver Fujinon XF 35mm f/2R WR on my Fujifilm X-E2 body
with a wonderful Burke Mountain Leather custom strap and Fujifilm hand grip

Saturday, November 14, 2015

Bookmark and Share

Gallery: Anza-Borrego Desert State Park, CA


Gallery (100 images): Anza-Borrego Desert State Park, CA

More catching up on photo processing! This is the first gallery from my March 2010 trip to southern California. It encompasses some photos from my drive down through California and then two days of shooting in Anza-Borrego Desert State Park.

It was an amazing year for blooming wildflowers and cacti, so I made the long run down to SoCal for a quick eight day road-trip. The above photo shows one of the abundant ocotillo shrubs in Anza-Borrego, with clusters of red/orange blooms at the ends of long spiny stems with lush green leaves. The park was exploding in bloom and the local papers were giving tips on the best places to see all the wildflowers. Well, it turns out I had to avoid those places, since the ones mentioned were packed with people (see photo 86!), many of whom were just lounging in the fields of desert wildflowers, off to the side of the road with folding patio chairs and coolers of beverages! Then there were all the other photographers in those spots too, zigzagging through the fields of blooms. Well, after visiting a few areas like that, I decided to explore the backroads myself, well away from the spots mentioned in the papers, and had a much more pleasant and fruitful time photographing away from the crowds...

All posts from this trip: California 2010

Sunday, November 1, 2015

Bookmark and Share

Gallery: Rhyolite and Mojave National Preserve


These are the first shots from my May trip to southern California, with my blog postings moving backwards from last to first. You can see all the galleries from this trip in order by clicking the following...

Link: All galleries from this trip...

The drive south from BC was mostly rainy and stormy and things didn't really clear up until I hit southern Nevada and the ghost town of Rhyolite. After Rhyolite, I bombed through Death Valley, deciding I should make time and get to Joshua Tree National Park to have a few days before the Memorial Day Weekend crowds hit. It was somewhat hazy through Death Valley, so I didn't take any shots until I got to the Mojave Desert National Preserve further south. I wanted to head over to the huge Kelso Dunes, but even there, the skies were very hazy and mostly gray. A little further south in the Mojave National Preserve, the skies started to improve and I finally took some photos. A lonely red Fishhook Barrel Cactus, with heavy and vicious spines, served to add some colour to five of the photos from one spot. The following morning was once again overcast and gray, not really clearing until I got to Joshua Tree National Park.

NOTE: Apologies, but I have noted that some of the "Back to post" links at the top of each image gallery are not returning you to the proper originating blog post as intended, rather back to the main page of the blog. I have not been able to figure out if this is a glitch due to the redirects from my mikemander.com domain host or something to do with Google Blogger. It was working fine for the longest time but within the last week, I noticed this glitch. Will be trying to fix this...

Sunday, October 25, 2015

Bookmark and Share

Gallery: Joshua Tree National Park - Day 1


Gallery (40 photos): Joshua Tree National Park - Day 1

I was camped a ways north of Joshua Tree National Park, in the Mojave Desert National Preserve, and in the morning I had gray, overcast skies. I did take some photos near the Sweeney Desert Research Centre, but due to the dull light, none of them made it into this gallery. By the time I got to Joshua Tree National Park, drove around to decide on a campground and secured a site at "Jumbo Rocks", it was already later in the day, so I didn't get a whole lot of shooting in. Thankfully, the skies there was much nicer than what I had in the morning!


For a brief, 1920x1080 time-lapse movie (a 10.4MB download) of the sunset shown in the first photo, click the image above to open in a new window. For this 5 second time-lapse movie, 138 frames were taken over about 34 minutes but unlike my regular photos, they were just processed in Lightroom and not in PhotoNinja.

Link: All galleries from this trip...

Monday, October 12, 2015

Bookmark and Share

Gallery: Joshua Tree National Park - Day 2


Gallery (65 photos): Joshua Tree National Park - Day 2

How time flies! It's now been well over a month already since my last posting of a gallery from my California trip, earlier this year. This is day two in Joshua Tree National Park, with more shots of amazing eroded boulders and rock formations. I shot quite a bit near the Jumbo Rocks campground, where I had stayed two nights. I did a morning hike from where I was camping, then traveled around Joshua Tree park for the day, coming back in the evening to shoot until sunset at Jumbo Rocks again. There are some great rock formations and views a mere 10 to 15 minutes of hiking from where I had set up my tent, a very cool campsite to stay at for sure!

Link: All galleries from this trip...
Bookmark and Share

Gallery: Fall, and more XF 90mm f/2 tests...


Fall is coming, the leaves are changing and I spent another day with Fujifilm's 90mm f/2 firmly attached to the front of my X-E2. When I get a new lens, shoot with it, and then scarcely want to take it off the camera... well that's a sign that I really like that lens. My previous lens purchase, the XF 16mm f/1.4, was the same: on my trip to California earlier this year, about half of my 3300 photos were taken with that 16mm. Even though longer focal lengths are not something I use all that often, the 90mm has given me such wonderful results, that I've been using it a lot more than I thought I would.

There seems to be something almost "magical" in how it renders highlights, be it reflections on water, or reflections off metal or chrome.  Look at the large version of photo 43 in the gallery for example, and maybe you'll see what I mean? The 90mm is so sharp that I want to seek out textures too: old crumbling brick walls, rusting metal or decaying, yet colourful leaves. An added bonus is that it focuses very closely, considering it is not a macro. In fact, it offers roughly 1/4 life-size reproduction at its closest focus. Some portrait lenses have a tough time getting you a tight headshot, but with this 90mm, you can frame a face tightly enough to capture just the eyes.

Lastly, I wanted to mention how perfect the aperture ring feels on this lens, despite it being a WR design. Detents are firm and crisp, with full stop detents being distinctly stronger than its 1/3 stop detents, attention to detail which is commendable in my view. This is not the only Fujifilm lens to offer this full-stop/third-stop difference in feel, but it is one of the most obvious that I have felt. This little bit of "tactile perfection" is something that just makes the lens even nicer to use in practice. Not all Fujifilm lenses have felt so good, with the 18-135mm kit lens having a particularly mushy and vague aperture ring for example, but the aperture ring on this lens feels, at least to me, just about perfect. I am stating this as a distinct point of praise for Fujifilm's lens engineers, with the hopes that they take this to heart and not only continue to design future lenses that are superb optically, but make ones that also feel equally superb mechanically...

Saturday, October 3, 2015

Bookmark and Share

Gallery: Fujifilm XF 90mm f/2 Tests


Gallery (30 images): Fujifilm XF 90mm f/2 Tests

These are my first tests of Fujifilm's excellent new Fujinon XF 90mm f/2R LM WR portrait prime lens. It has a linear-motor (LM) mechanism for fast, quiet focusing and the WR designation means it has a water and dust resistant design. In short, it is a truly superb new addition to Fujifilm's extensive lineup of impressive prime lenses. More comments on its optical quality are in the notes at the top of the gallery. I have provided large, 4000 pixel wide images so you can closely examine its image quality, since smaller ones hardly do justice to the sharpness and clean rendering of this lens.

I was fortunate enough to have some interesting fog over the city during sunset too, although with handheld shots at slower shutter speeds, not enough sleep and too much coffee that day, I fear some of those won't be quite up to my usual sharpness standards. Not to mention the contrast sucking nature of the fog will make things look softer in general too. However, the first set of images done earlier in the day with better light (1-18), those should show what the lens is capable of. Seeing as how I called it a "portrait lens," yes there are a couple of portraits (thanks Nicole!), shot wide open at f/2 as well.

It's likely that this lens might replace the 50-230mm in my general "hike around" kit since for landscape work, when I did use that zoom, I often found myself shooting around 90mm with it anyway, give or take. It has been rare that I ever framed a pure landscape (or even cityscape) shot at much more than 100mm, so the 90mm should work perfectly in a great many instances. Of course, if birds or wildlife are my intended subject, then the 50-230mm will come along as well, or eventually, the upcoming 100-400mm zoom.

The 90mm brings me one step closer to having an ideal prime lens kit. I am now waiting for the new XF 35mm f/2 to arrive (scheduled to ship in November I believe), which will then likely replace the 18-55mm zoom in my kit, which I am now using more or less as a 35mm stand-in. At that point, my primes will be 16mm f/1.4, 23mm f/1.4, 35mm f/2, 60mm f/2.4 macro and 90mm f/2. I do also have the 14mm f/2.8 but I often want wider, so the 10-24mm f/4 will be the standard ultra-wide in my lens kit. Since it is extremely good too, especially in its mid range (around 14mm), the 14mm prime will seem a bit redundant to be honest and I likely won't take it with me on a regular basis. The 16mm is quite close to the 14mm as far as focal length and is so incredibly good, that I wouldn't miss the 14mm all that much I think. The last prime lens I will be wishing for, is something in the 9mm to 11mm range but unfortunately, I have not seen even the slightest hint of anything like that coming...

As much as I like primes lenses, I also have the ability to travel light with a three zoom kit if size and weight are a concern: the 10-24mm, 18-55mm and 50-230mm, all image stabilized and surprisingly good optically, especially the 10-24mm!

Sunday, September 20, 2015

Bookmark and Share

Gallery: Grouse Mountain


Gallery (65 images): Grouse Mountain

The first day with my cousin and his wife was spent up on Grouse Mountain. The weather was overcast and grey when we first got there, and even the grizzlies seemed dejected. It was still overcast for the lumberjack show but for the "Birds in Motion" raptor show, the skies started to clear. The raptors were definitely the highlight of the day...

Saturday, September 19, 2015

Bookmark and Share

Gallery: Burnaby Mtn, Belcarra Park and Pitt Lake...


Another few days of sightseeing with my cousin and his wife. First off, some views down onto Vancouver and up Indian Arm from Burnaby Mtn, then at Belcarra Park for sunset. After seeing some of my photos near Pitt Lake, the next day my cousin decided that he'd also like to go there and thankfully, the weather cooperated with some fairly dramatic skies too.

Sunday, September 13, 2015

Bookmark and Share

Gallery: Victoria, BC


Gallery (60 images): Victoria, BC

I've taken some time off from working on my previous trip images since my cousin Marco and his wife had come for a visit from Germany. Our main excursion, while they were visiting Vancouver, was to take the ferry over to Victoria and spend the day sightseeing. The gallery above contains some of my images from that outing...

Thursday, September 3, 2015

Bookmark and Share

Gallery: Death Valley, CA - Days 1 & 2...


Gallery (60 images): Death Valley, CA - Days 1 & 2

This gallery contains images from my first two days at Death Valley National Park. After my drive up from Joshua Tree National Park, I was amazed at how few people were camping at Furnace Creek, despite the fact that it was the Friday before Memorial Day Weekend. Since it was already fairly hot and already considered the off-season in Death Valley, the campground had relatively few people and a big part of it was already closed of entirely. After finding a reasonably shaded spot for the tent, I set up camp and then headed over to Zabriskie Point and photographed sunset there.

On the second day, I drove the Titus Canyon Road in from Nevada, stopping the photograph the ghost town of Leadfield and many other scenic spots along the way. Later that evening I spent time on the sand dunes at Stovepipe Wells, the Mesquite Dunes, where I thankfully managed to hike out to an area devoid of human footprints. There was some amazing light and after the skies started looking ominous, I decided to make time back to the vehicle. Indeed, when I got back to the car, it was very windy and there was a huge wall of sand and dust headed my way! I started doing a time-lapse of the approaching sand but that was cut short when it hit fairly quickly. The winds then were so strong, that it send my tripod skittering and skidding across the road! Luckily I had just taken my camera off and I chased it down...

I drove back out of the sandstorm at low speeds with my hazards flashing, which is what other cars were doing as well and once I cleared the cloud of sand, I booted it back to my campsite to the south at Furnace Creek. Luckily I beat the sandstorm there by about 10 minutes and managed to get all my vents inside zipped shut to keep out the blowing sand and dust. Unfortunately it was a hot and muggy night with all the vents shut and the temperature in the tent never dropped below 35º C, at least not until about 2:00am when the storm abated and I could open up some of the vents again. Still, it really didn't cool off much that night, maybe a few degrees lower only. With all the fiercely blowing sand and dust, thunder, lightning and some intervals of pelting rain too, my tent was a blotchy, muddy mess the next morning.

Link: All galleries from this trip...

Wednesday, September 2, 2015

Bookmark and Share

Gallery: Death Valley, CA - Day 3...


Gallery (60 images): Death Valley, CA - Day 3...

On day three in Death Valley, I visited numerous diverse locations. On the way to Aguereberry Point, I stopped off at the Eureka Mine ruins and also at the Aguereberry Camp ghost "town", although with only a few buildings, I suppose it is too small to really be called a town. What surprised me, is that even though the buildings are visible from the main road leading to Aguereberry Point, and it is only a short drive on a dirt road and 2 minute walk from the parking area, there is actually very little graffiti. One building had one room with its walls filled with graffiti (photo 18 in the gallery), but that is pretty much it. The old house pictured above, actually has virtually none at all, neither on the inside nor the outside. This is really a nice change since I much prefer photographing "pristine" ruins that have not been defaced in more recent times with spray-paint and graffiti!

After photographing the ruins, I headed up to Aguereberry Point and was rewarded with some wonderful cloud shadows and quite clear vistas. The wide panorama in the gallery was a stitch of four shots. Strangely enough, despite the fact that I was up there during the Memorial Day weekend, there was nobody else at the viewpoint! In fact overall, Death Valley was quiet on what I presumed would be a very busy weekend where tourists generally flock to the national parks. I suppose it was late enough in the year already that the heat was keeping people away. Indeed, despite the big thunderstorm the night before with rain and high winds, the nighttime temperatures in Furnace Creek didn't drop below about 35º Celsius.

After enjoying the views at Aguereberry Point, I headed over to the mill ruins at the ghost town of Skidoo (more great clouds there) and then finished off the day at the Stovepipe Wells sand dunes. It seemingly was a very busy day for tourists on the dunes though, since there were tracks and footprints everywhere, despite the fact that previous night's storm had likely erased all the tracks on the dunes from before. The ridges along the highest dunes were flattened down from all the people walking there, which you can easily see in some of the photos...

Link: All galleries from this trip...

Tuesday, September 1, 2015

Bookmark and Share

Gallery: Mono Lake, CA


Gallery (40 images): Mono Lake, CA

Originally I was scheduled to head down to Oregon for a week, but due to the lingering smoke and haze from the many fires burning in Oregon, Washington and Idaho, I decided to stay home and work on images from some previous trips. So, continuing on with the "reverse" postings from my May road-trip to southern California...

After camping for three days in the sweltering heat of Furnace Creek in Death Valley, I headed north to photograph the ghost town of Bodie. On the way north, I decided to stay at a hotel in Lee Vining that evening, and this not only gave me an opportunity to visit Mono Lake's South Tufa area, but also to have a much needed shower!

Link: All galleries from this trip...

Saturday, August 15, 2015

Bookmark and Share

Gallery: Bodie & Yosemite, CA


Gallery (75 images): Bodie & Yosemite, CA

The ghost town of Bodie, a little ways northeast of Mono Lake in California, must be one of the largest, well preserved ghost towns around. The state park service has been carefully keeping Bodie in a state of "arrested decay" (their words), with some patching up of buildings having been done in such a way as to look as original as possible, using aged lumber etc., at least that is what I was told during my last visit back in 2003. I must say, I did notice during this time that some of the newer repairs do not look that authentic, with much fresher looking boards being used etc. Nonetheless, generally speaking, the town is pretty amazing and well worth exploring!


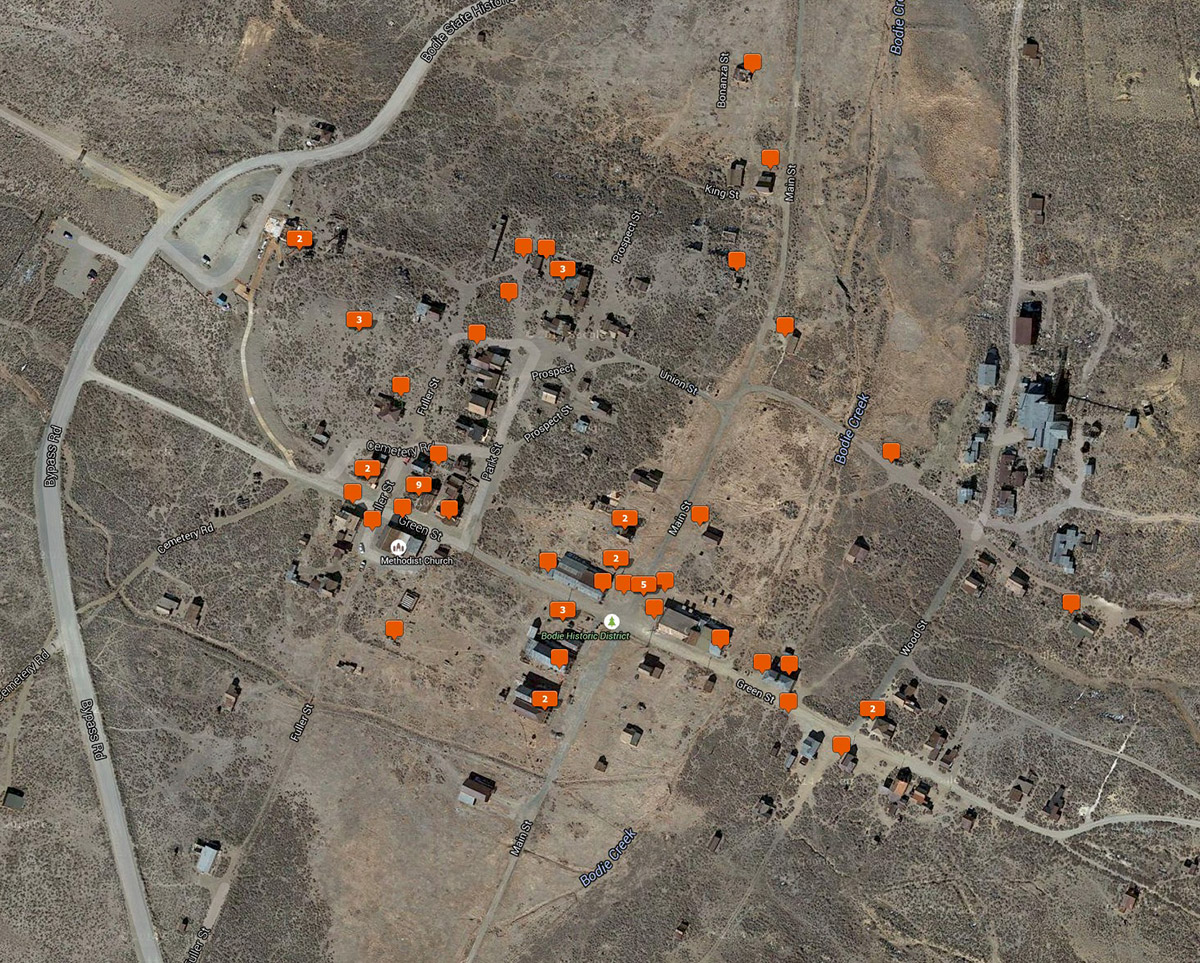
I spent many hours wandering through Bodie and took many shots of interiors, mostly from the outside, looking in through dusty, hazy, blotchy windows. Above is a screenshot from Lightroom's map view, showing the location of the 64 photos in my gallery that were taken in Bodie. The large mill complex you see near the right edge is fenced in and off limits to the public due to dangerous conditions, although I believe one can arrange to go on a tour. The black-flies were nasty when I was there and managed to make it through my vented Outback hat. At the end of the day, I had dozens of itchy bites on my scalp! However I was fully in "photo mode" and because I was concentrating on shooting, I somehow managed to mostly ignore that irritation.

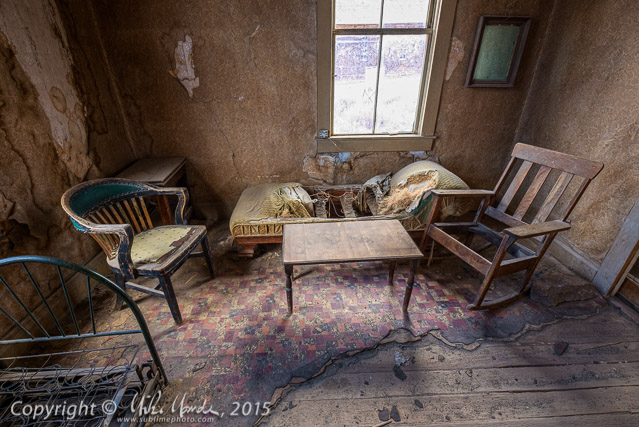
Many interior photos that I had taken through glass were lacking in contrast and saturation, due to the hazy dust coating the windows. Lightroom and PhotoNinja allowed me to make quick work of restoring the shots to a proper level of contrast, despite the fact that I am not using the latest version with the "De-Haze" filter. In a few cases, I selectively adjusted bright, out of focus blobs that came from particularly large white specks on the windows that were reflecting outside sunlight. Generally I held my camera with my right hand, and used my left hand, sometimes holding my hat, to try and minimize window reflections from ruining the shot. I also often removed the lens hoods from my lenses and went as close as possible to the window panes to try and minimize outside reflections as well. I wore a black jacket too so it wouldn't add to the reflections. All in all, I am actually very pleased at how many of those difficult shots turned out quite well!

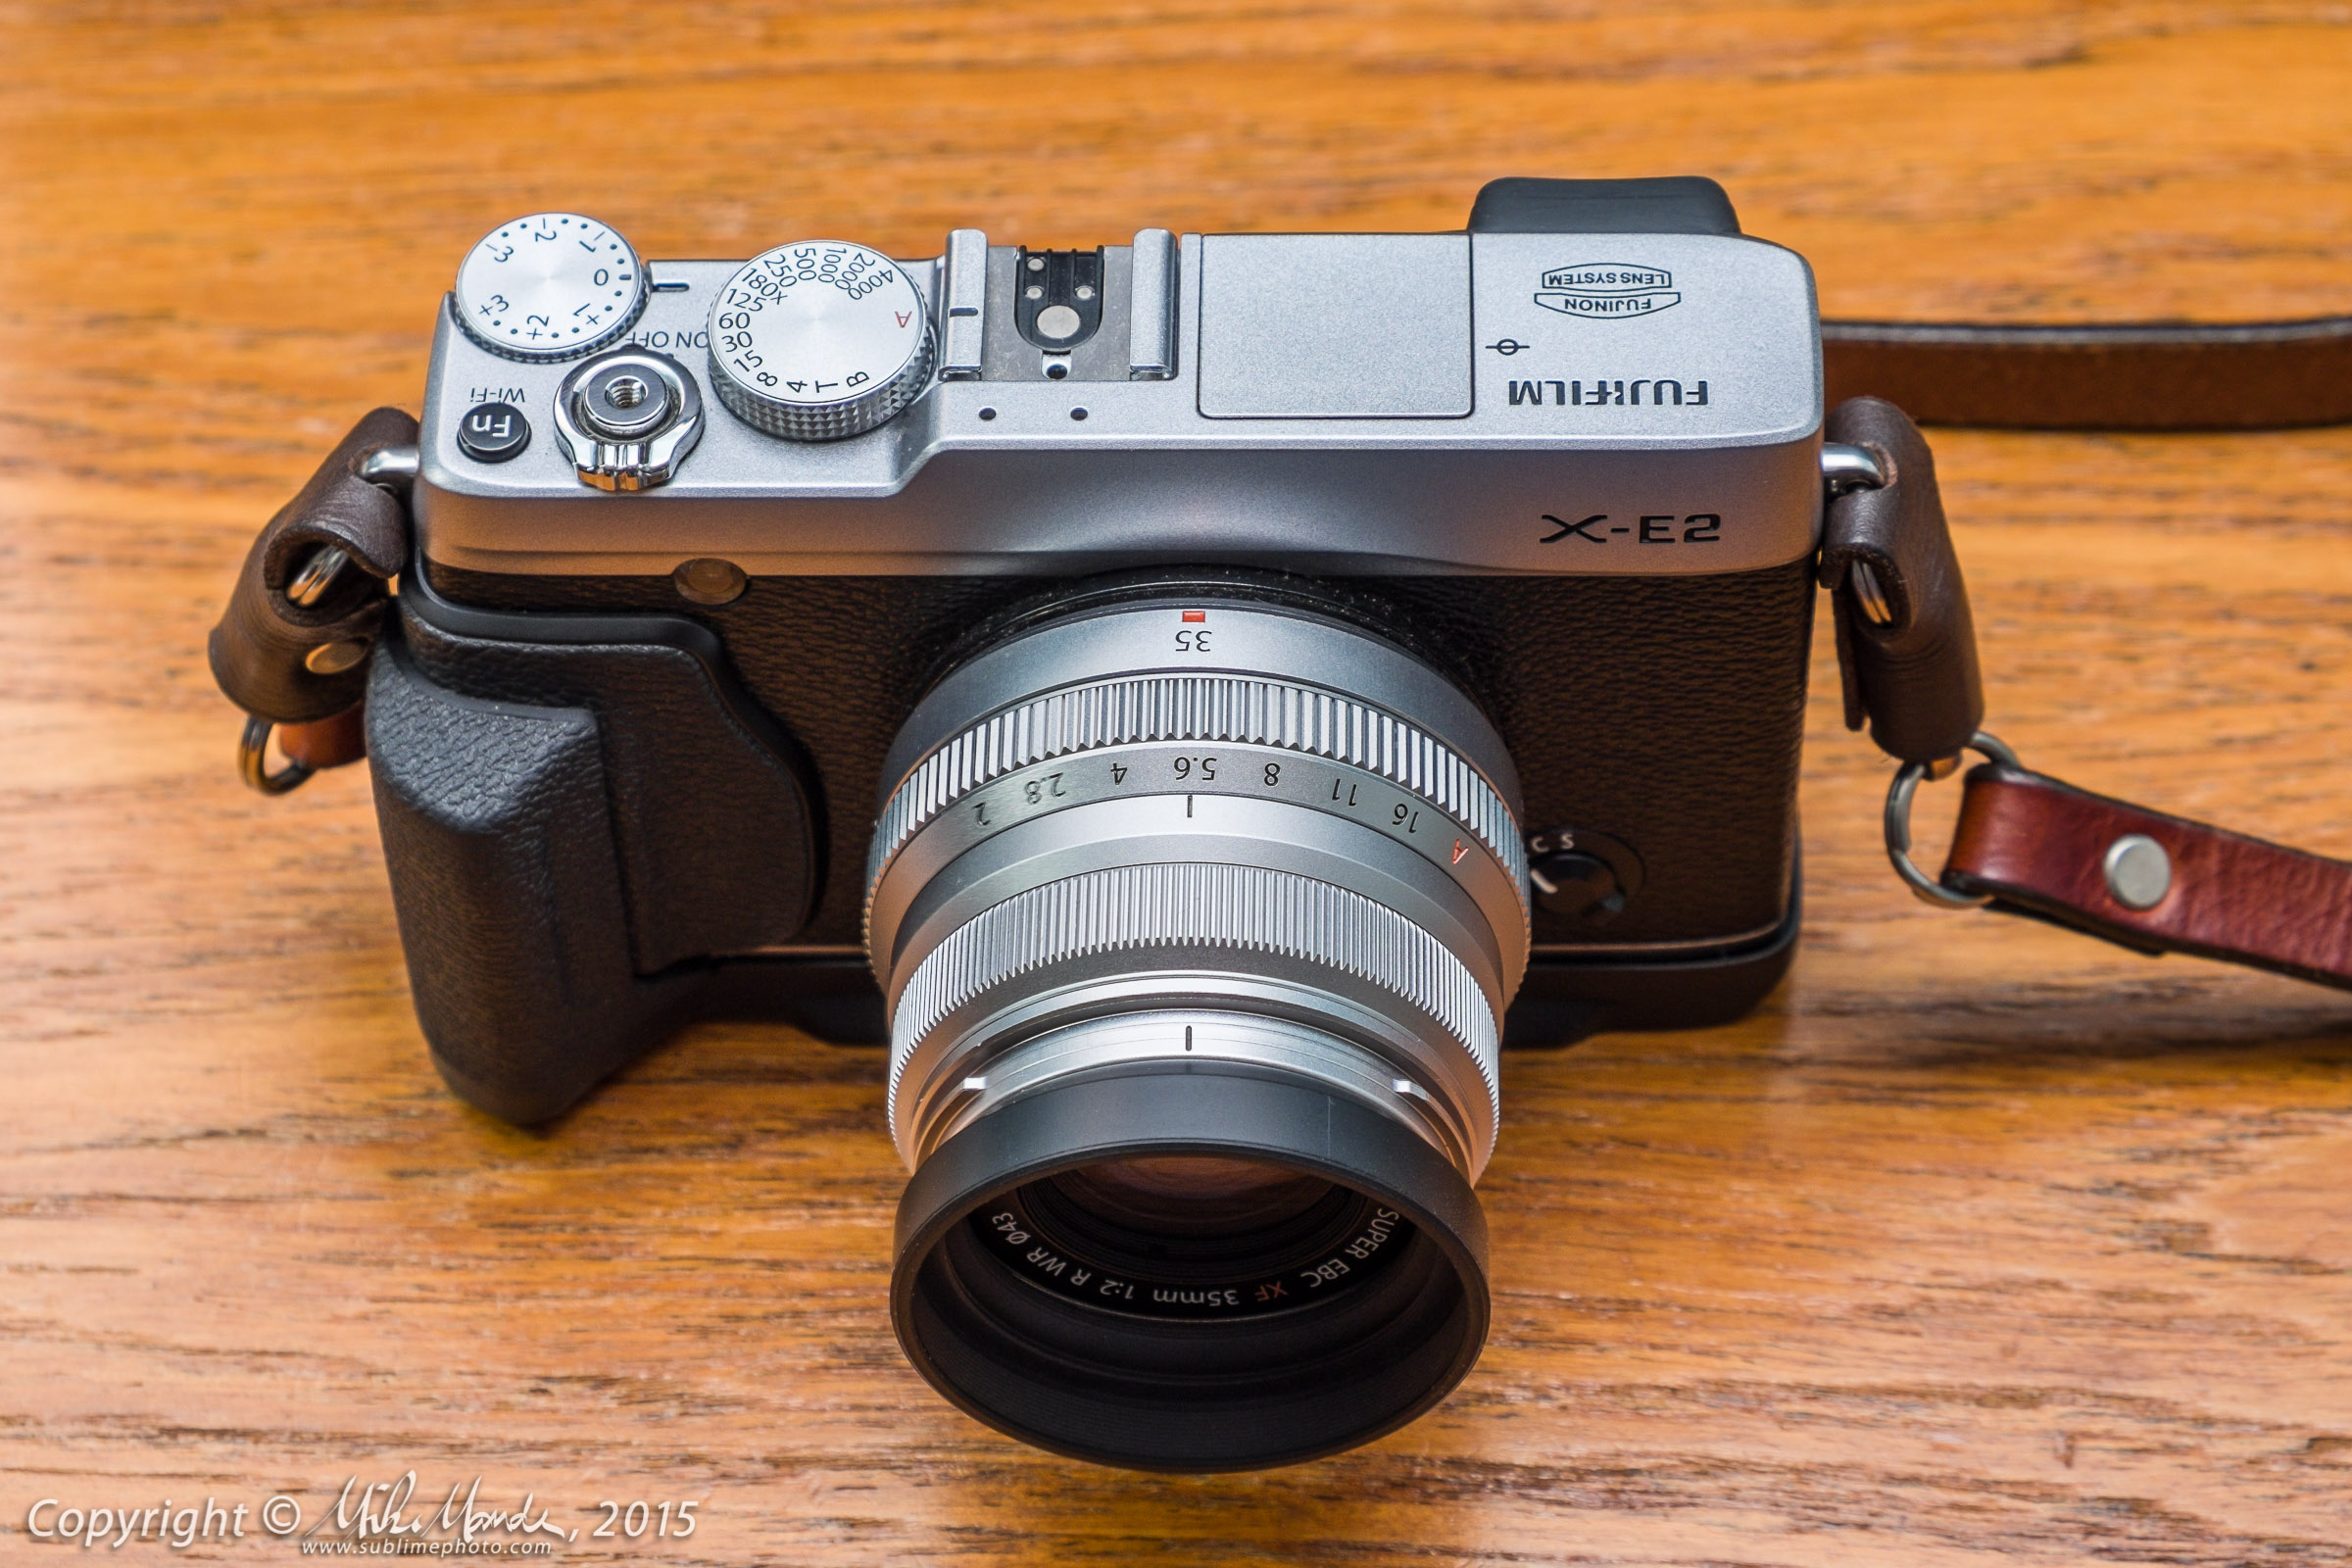
During my last visit to Bodie in 2003, I was shooting film with a Pentax 67II and a Fujifilm 6x17 panoramic camera. None of the interior shots I tried doing with that Pentax, from the outside looking in, worked out at all. I was likely shooting either Fuji Velvia (ISO 50) or Provia (ISO 100) at the time and needed to use a tripod for any shots with slower shutter speeds. With the tripod I had back then, I couldn't get the camera close enough to any windows to avoid reflections, and there is no way that I would have had any chance at all of handholding the 67II and getting sharp interior photos either, with those slow film speeds and a lot of shutter and mirror vibration. Plus, the minimal dynamic range of slide film would not have allowed me, in many cases, to capture the brightness range needed in a single frame, where window light was the sole illumination for deep interiors. Shooting with a lightweight digital camera (my Fujifilm X-E2) which has minimal vibration, very good dynamic range and quite clean high ISOs, as well as using lenses that are sharp at wider f-stops, allowed me to get shots I never could have back in my film days!

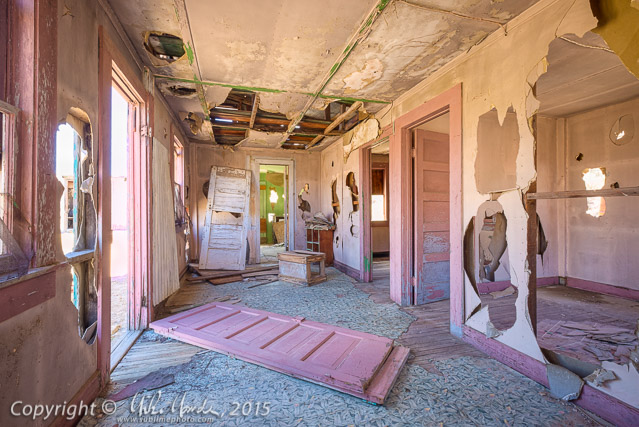
However, luckily some shots this time were actually taken from the inside (no glass in the way) and those were much easier to do, for example, like the image at the top of the this post. The description at the start of the gallery specifies which shots were taken from inside a few of the buildings or where there was no glass. Enjoy!

Link: All galleries from this trip...

Thursday, July 30, 2015

Bookmark and Share

Beau Photo Supplies - Fuji Photo Walk


I helped host the first Beau Photo Supplies sponsored Fujifilm Photo Walk on Granville Island with one of the "Fuji Guys", Gord Webster and a local Fujifilm sales rep, Ramin Shahidian. Also from Beau Photo, Jason Kazuta (rentals) and Ken Shymka (pro sales) also helped out, answering questions and experimenting with Fujifilm gear. The gallery linked to above has shots that I took during the pleasant two hour outing, where lots of enthusiastic Fujiiflm "X-shooters" came to hang out, ask questions and borrow Fujifilm lenses and cameras to try out for the evening. A few people shooting with Canon and Nikon systems were there too, wondering if the Fujifilm system might be right for them perhaps…


Gord Webster set up a camera and triggered it remotely via WiFi for his "X-shooter" portrait of the participants above. A big "thank you" to Gord, Ramin and Fujifilm Canada for helping to organize this  event and for providing the huge number of loaner bodies and lenses that people eagerly shot with!

For the first hour or so of the walk, the skies were largely a hazy overcast, but when the sun broke through later, close to sunset, the light was quite nice…


Sunday, June 28, 2015

Bookmark and Share

Gallery: Northern California Redwoods


Gallery (40 images): Northern California Redwoods

Since I started posting images from my recent trip from the last day, I thought I would work backwards since eventually, you'll see the posts in the order I took them, top down. So, from days 12 and 13 of my trip...

On the way up the California coast, I stopped in Redwood National Park and Jedediah Smith Redwoods State Park and photographed the towering trees, a type of giant Sequoia (actually Sequoia sempervirens), more commonly known as the coast redwood or California redwood. These trees can live from 1200-1800 years and the tallest ones approach 120 meters (400 feet) in height, with trunks nearly 9 meters (30 feet) wide near the ground. Sadly, I had no fog when I was there and just had to deal with the dynamic range of sunlight streaming in through the big trees. With no fog, at least I got punchy and vibrant colour. The last three shots are from the southern Oregon Coast, with the very last shot being the "sunniest" weather I saw on my entire coastal drive north.

Note that a total of 31 out of the 40 shots in this gallery were taken with my excellent Fujifilm XF 16mm f/1.4 lens, so if anyone is looking for more samples, have a browse. In keeping with the huge trees, the larger images are available in big, 3000 pixel wide versions, to better allow you to see details in the trees and forest...

Link: All galleries from this trip...

Saturday, June 13, 2015

Bookmark and Share

Gallery: Ruins of Bordeaux, WA


Gallery (35 images): The Ruins of Bordeaux, WA

Ever since seeing photos of Bordeaux, Washington state, online a number of years ago, I always wanted to visit this crumbling ghost town. Recently, I happened across some new images which suddenly showed a fair bit of graffiti, so I knew I had better visit sooner rather than later! Alas, what remains of Bordeaux, at least where there are no plants getting in the way, already does have quite a bit of graffiti, so I suppose I waited too long.

Bordeaux was a logging town, and the majority of the shots in the gallery are of the old sawmill. Most of what is left of the other buildings are either low, crumbling, overgrown foundations, or rectangular, bunker-like concrete structures. Photos 3 and 4 in the gallery are of the remains of an old smoke stack, but I didn't bother using shots of any of the other building remains since they weren't very interesting to look at. However the mill building is fascinating and I do wish I had gotten there before all the graffiti artists... and before all the slobs that have used the flooded, lower levels as a dumping ground for beer cans, pop bottles and coffee cups.

Due to the sun streaming through the trees and the many deep shadows, the contrast and dynamic range were a challenge on many shots, as was the colour balance since the light coming through the trees became very green tinged. Using PhotoNinja on my Fujifilm X-E2 raw files actually allowed recovery of a fair bit of blue sky through the foliage, however I actually found it distracting and intentionally desaturated and brightened it up to look more or less blown out. I also intentionally left out the GPS metadata on these shots. If you really want to visit Bordeaux, a bit of searching on the Internet will get you directions, but I really don't want to make it too easy for more vandals to find what little is left of this town. Not that my blog has enough readership that I really need to worry about that...

There is an extensively researched article about Bordeaux, on the Dark Roasted Blend website, and if the history of the town interests you, I highly recommend the read.

The photos are actually from my last day of shooting during my California roadtrip from a few weeks back. Despite the graffiti, I find the vegetation encrusted ruins fascinating and decided that it would the first gallery I post from my trip. More from that trip to come soon...

Link: All galleries from this trip...

Sunday, May 10, 2015

Bookmark and Share

Tested! Fujifilm XF 16mm f/1.4R WR


Gallery (35 images): Tested! Fujifilm XF 16mm f/1.4R WR

A couple of weeks ago, Fujifilm announced a new, fast wide-angle 16mm prime lens, equivalent to a 24mm in full-frame terms. Notably, this is Fujifilm's first prime lens with the WR designation, meaning it has dust and water resistant construction. I had the opportunity to test a pre-production sample of the new 16mm almost immediately and now, just a few weeks later, I've had a chance to throughly test a final production sample. In short, this new prime is extremely impressive! Compared to the Fujifilm XF 23mm f/1.4R, which I consider one of the very best wide-angle lenses I have ever used (regardless of brand), this new 16mm holds up to the 23mm in pretty much every way. Also, considering how much wider it is, being equivalent to a 24mm in full-frame terms versus a 35mm equivalent for the 23mm f/1.4, the size and weight increase over the 23mm is really quite minimal.

Like the 23mm f/1.4, the new 16mm is essentially 100% corrected optically for distortion, therefore no software correction will be needed; straight lines render straight with no apparent barrel or pincushion distortion, even at the very edges of the frame. For shots where the focus is quite close, less than a few meters, there does appear a slight hint of barrel distortion, but for most shots, especially at further distances, it is virtually nonexistent. In addition, I see no evidence of any chromatic aberration either - nothing! With its Nano-GI anti-reflection lens coatings (which the older prime lenses do not have), it is extremely resistant to lens flare when shooting into the sun as well, something that fast, wide-angle primes are often not very good at. Even the wide-open bokeh is surprisingly smooth and pleasing, not something one would necessarily expect from such a wide lens either.

Saturday, May 9, 2015

Bookmark and Share

Tested! Fujifilm XF 16-55mm f/2.8R LM WR


Back in February, I finally had the opportunity to shoot with a production grade Fujifilm XF 16-55mm f/2.8R WR LM zoom lens and now finally, after a long delay, I've made an effort to publish a review. This professional grade, weather resistant (WR) zoom lens has a constant f/2.8 aperture throughout its range and has very fast focusing due to Fujifilm's linear-motor (LM) system. For an early look at its build quality and some initial comments on the performance of a preproduction version, see my posting on the Beau Photo blog here: Coming soon... Fujinon XF 16-55mm f/2.8R LM WR

Most of the comments on the preproduction lens hold fast with the final version too, so excellent centre sharpness at all focal lengths, even wide open, smooth bokeh at 55mm which is nice for shooting portraits, very low chromatic aberration and virtually no purple fringing. One thing that I hadn't had a chance to test previously was the lens' flare resistance, and in that way the 16-55mm proved exceptionally good. If you look at several images shot straight into the sun in the sample image gallery (one of them shown above), you'll see how flare and loss of contrast are almost nonexistent in those situation. Very impressive indeed!

Sunday, April 26, 2015

Bookmark and Share

Gallery: Southwest 2010 / Days 18 - 20


Gallery (25 images): Southwest 2010 / Days 18 - 20

This final set of photos from my 2010 trip include a hike through the windy and dusty Bisti Badlands in Northern New Mexico, then some shots on the drive home through Colorado (the above being one of them), Lake Coeur d'Alene in Idaho, steaming in the cold morning air and finally, a shot of the Columbia River at Vantage in Washington. That is the last "daily" gallery from this trip... coming in the near future will be a best-of with highlights...

All posts from this trip: Southwest 2010

Sunday, April 19, 2015

Bookmark and Share

Gallery: Southwest 2010 / Days 16 & 17


Gallery (115 images): Southwest 2010 / Days 16 & 17

This large gallery has a few images of El Malpais at the start, but the majority consist of the amazing ruins at Chaco Culture National Historic Monument, sometimes just called Chaco Canyon.

All posts from this trip: Southwest 2010

Wednesday, April 1, 2015

Bookmark and Share

Spring 2015 in Vancouver!


Gallery (35 images): Spring 2015 in Vancouver!

A beautiful evening of wandering around, enjoying the warm spring weather with my Fujifilm X-E2 and the outstanding XF 18-55mm f/2.8-4R LM OIS kit zoom lens...

Sunday, March 22, 2015

Bookmark and Share

Gallery: Fujifilm XF 18-55mm f/2.8-4R LM OIS Revisited...


Before I get into this main topic of this post, let me point out a few changes I made to this blog today. The separate links section on right side of the page has been removed and in its place, a list of image galleries has been added. These will filter the blog and only show postings that have links to image galleries for the relevant year. In addition, I have edited the main "SHOW" menu at the top of the blog, to remove the beauphoto blog entry link and put in its place, a "Major Trip/Event" link which will filter the blog to show only entries relevant to either a major photography trip I have been on, or for a major event I have photographed, like galleries related to the 2010 Olympics for example. The links have now all be moved to a "Links Elsewhere" page, which has been revised as well. Okay, so now to the main topic...

Above is a link to a gallery of images from Fujifilm's XF 18-55mm f/2.8-4R LM OIS zoom lens. I used to own that lens but sold it along with my X-E1 body well over a year ago. After selling it, I actually missed having a mid-range "walk-around" zoom, but had decided to wait for Fujifilm's XF 16-55mm f/2.8 pro-series zoom to arrive. As impressive a lens as the new 16-55mm is overall (a review of that lens is also coming), after testing it I decided not to get it after all. It was simply too big and heavy for me to have any interest in carrying it around on a regular basis! So, when I recently ordered myself a second X-E2 body, I decided at the last minute to order it with the 18-55mm kit zoom. I am actually quite impressed with the little 18-55mm and it seems better optically than I remember it being...

Sunday, March 15, 2015

Bookmark and Share

Gallery: Southwest 2010 / Day 15


Gallery (45 images): Southwest 2010 / Day 15

Three interesting places, visited in one day! Firstly, the Bosque del Apache National Wildlife Preserve (with lots of basking turtles as above), next the Very Large Array (VLA) facility, a part of the NRAO, or National Radio Astronomy Observatory and finally, an evening photographing the bluffs at El Malpais National Monument.

All posts from this trip: Southwest 2010

Wednesday, March 11, 2015

Bookmark and Share

Gallery: Southwest 2010 / Days 13 & 14


Gallery (40 images): Southwest 2010 / Days 13 & 14

The above photo was taken at sunset, near Chisos Basin in Big Bend National Park. The gallery contains images taken in the park, along the Rio Grande River and then also further north at McDonald Observatory, featuring the huge 10 meter Hobby•Eberly telescope.

All posts from this trip: Southwest 2010

Sunday, March 1, 2015

Bookmark and Share

Gallery: Southwest 2010 / Days 10 - 12


Gallery (50 images): Southwest 2010 / Days 10 - 12

The above photo was taken in Big Bend National Park, however the gallery starts with two more observatory visits. Day 10 saw us first visit Sacramento Peak Observatory and then Apache Point Observatory. We decided to take a back road out towards the south to return to the campground near White Sands, however this proved a very rough and long route, pretty much killing the rest of the day. In addition, we ended up accidentally driving through a military range and at one point, a convoy of Hummers and other military trucks came up behind us, thankfully just driving by when I pulled over to let them pass. The next day we did more driving than photography, first over to Carlsbad Caverns and then, at that point, we made the decision to head south towards Big Bend National Park. The next day was mostly driving as well with some gorgeous evening light and storm clouds which greeted us, once we reached Big Bend NP...

All posts from this trip: Southwest 2010

Saturday, February 28, 2015

Bookmark and Share

Gallery: Southwest 2010 / Days 8 & 9


Gallery (90 images): Southwest 2010 / Days 8 & 9

Two major National Monuments in New Mexico comprise this new gallery of images from days 8 & 9 of our trip, the first being Gila Cliff Dwellings, the left image above, and the second White Sands on the right. For more info on White Sands, see the description in the gallery.

The dynamic range of photos taken at the Gila Cliff Dwellings was a challenge. The ruins were in the shade under a deeply overhanging cliff and yet the beautiful exterior landscape was often visible in wide-angle shots, with lovely blue skies and trees that would be a shame to let blow out. I remember working on these images back in 2010, with a much older version of Adobe Lightroom, and found it challenging to get anything that looked decent from many of the shots. The sky was often bleached white and the lifted shadows were noisy. I must say, Adobe has come a long way with its image processing in Lightroom over the years, and while I am not a fan of how it handles my more recent Fujifilm X-Trans raw files, it does do a pretty good job of my older Canon EOS-7D raw files with their standard Bayer-pattern pixel layout...

All posts from this trip: Southwest 2010

Wednesday, February 18, 2015

Bookmark and Share

Gallery: Southwest 2010 / Days 6 & 7


Gallery (50 images): Southwest 2010 / Days 6 & 7

On day 6, we travelled east from Organ Pipe Cactus National Monument, over to Kitt Peak National Observatory, with an interesting view of the McMath-Pierce Solar Telescope shown in the above shot. This was a trip of visiting observatories and there are many more photos of telescope domes to come in the following days. After Kitt Peak, it was over to New Mexico, where we camped at City of Rocks State Park...

All posts from this trip: Southwest 2010

Saturday, February 14, 2015

Bookmark and Share

Gallery: Southwest 2010 / Days 4 & 5


Gallery (65 images): Southwest 2010 / Days 4 & 5

The next two days of travel took us through Arizona, from Yucca and Wickiup in the northwest, to Organ Pipe Cactus National Monument, bordering on Mexico. There was lots blooming; cacti, shrubs and even Giant Saguaro.

At the backcountry campsite in Organ Pipe Cactus NM, there was an opportunity to photograph a time-lapse of a Saguaro blooming at night. I set my Canon 7D up with a 430EXII flash, and photographed the Saguaro for a few hours, with the blurred stars moving in the background. Photo 62 in the above gallery shows a wide view of the cactus I photographed. It is hard to tell, but if you rapidly sweep the movie slider back and forth, you can see one bloom opening. Click below to open the time-lapse in a new window (you will need to have Quicktime installed)...


Finally, since it was so warm and dry, I decided to set up the camera to do an overnight time-lapse which captured the Milky Way rising behind a lone Saguaro, all the way through until morning...


All posts from this trip: Southwest 2010

Monday, February 9, 2015

Bookmark and Share

Gallery: Southwest 2010 / Days 1 - 3


Gallery (65 images): Southwest 2010 / Days 1 - 3

I may have mentioned before how far behind I am in processing trip images? The last big trip I completely finished editing and processing was Germany in 2011 and now I am going back even further, starting on my US Southwest trip from May 2010 with my friend Bill. We made it all the way down to Big Bend National Park in Texas that year, on the Rio Grande river at the Mexican border. The colourful lizard above is one of many I saw at the Antelope Valley California Poppy Reserve on day three.

All posts from this trip: Southwest 2010

The last fully processed set of trip images were those from my Southwest 2009 excursion, and that one is still on my sublimephoto.com website, which ends with galleries shot in 2009. I actually have one more earlier trip to process, a solo one down to southern California in March of 2010. However, I decided to work on this one first since I may be heading back down to Texas, this year in spring, so I wanted to remind myself of the locations I visited last time.

I thought this might be an opportune time to mention some of the gear transitions I've been through in the last few years...

That May 2010 vacation is actually the last major photo trip I did with my Canon system, even though I didn't switch to Nikon until late 2012. I had been shooting with Canon digital SLRs since 2004, starting with an EOS-20D, then moving to a 30D, 40D, 50D and lastly the 7D. On this US trip in 2010, my Canon kit was comprised of an EOS-7D body and an IR-converted EOS-20D (my original 20D), with a Tokina 11-16mm f/2.8, then the Canon lenses, a TS-E 17mm f/4L tilt-shift, the EF-S 15-85mm kit zoom, an EF 24mm f/1.4L II, an EF-S 60mm f/2.8 Macro, an EF 70-200mm f/4L IS and finally an EF 400mm f/5.6L.

This was a substantially big an heavy kit, which is why I decided to lighten my load for my trip to Germany in 2011 with a combination of Panasonic and Fujifilm gear...

Wednesday, February 4, 2015

Bookmark and Share

Gastown photo walk with the Fuji Guys...


Pleasant company in unpleasant weather! That's how I'd describe the night out with Fujifilm, on a photo walk through Gastown in Vancouver with about 50 people and numerous Fujifilm reps, as well as Fujifilm Canada's new president. Lots of enthusiastic X-shooters turned out despite the rainy weather and, in fact, I'd say nearly all the people in the above photo were attendees. Click the image to see a gallery of 25 shots from that night...

Sunday, February 1, 2015

Bookmark and Share

Fujifilm's Fifty-Sixes Compared! The APD Effect…


A large version of the above here: APD-f1.2-lights.gif

Fujifilm has two versions of the their 56mm lens, the regular Fujinon XF 56mm f/1.2R and the Fujinon XF 56mm f/1.2R APD, one that has an internal apodization (APD) filter. Before I get into the technical lens details, let me mention that you'll see a number of animated GIFs in this blog posting that are comparisons between those two lenses wide open at f/1.2. Note that GIFs only have 256 colours in total and are dithered to allow them to display a 24-bit colour image. This dithering can be visible as some roughness or even slight banding in these animations. Also, for those who just want to dive in and look at images, here is a link to the full gallery with all the photos mentioned in this posting, each carefully shot at seven different f-stops with both lenses - 70 images in total!

GalleryFujifilm's Fifty-Sixes Compared! The APD Effect…

I chose to test the lenses at third-stops from f/1.2 to f/2 and then go right to f/2.8 and finally f/4 since the effect becomes so minimal once you stop down past f/2.0. The photos in the sample gallery were all shot on a tripod, with the two 56mm lenses changed carefully as to not move the camera. For some reason, I did notice a hint of movement on some sets that was likely my forgetting to sufficiently tighten the panning-lock on my ball-head, however, there was definitely a distinctly different "aim" to both 56mm lenses, something I found a bit unusual. Even though the shift was only slight, it was bothersome enough that on all the photo groups, I carefully cropped them ever so slightly, then nudged the crop frames around until I got the best superposition of the regular set with the APD set. While this was rather tedious, luckily Lightroom made it fairly painless. Once I had the f/1.2 versions aligned, I could just sync the crop settings on each group of smaller f-stops.

In order to show some of the bokeh effects more obviously, I heavily cropped two sets in the gallery, namely photos 15-28 and 57-70. On those, the frame you see is roughly a third the area of the whole field-of-view. All the others only have a tiny bit of cropping, just enough so I could achieve perfect alignment of each set of shots, well almost perfect at least. Lastly, there was some movement of branches due to wind, especially in photos 43-56.

For some less technical and more aesthetic samples, see this blog posting from a week earlier...

PostNicole with the Fujifilm XF 56mm f/1.2R APD

So, now for some details of what makes Fujifilm's 56mm APD lens (almost) unique...

Saturday, January 24, 2015

Bookmark and Share

Gallery: Nicole with the Fujifilm XF 56mm f/1.2R APD


Fujifilm Canada was kind enough to recently lend me both variations of their 56mm lenses, the XF 56mm f/1.2R and the XF 56mm f/1.2R APD. What the term "APD" stands for, is that variant's internal apodization filter, essentially an inbuilt radial ND filter that is darkest at the outer edge and feathers to clear part way in towards the centre. The effect this has, is to smooth out the transitional edges of the out-of-focus areas of an image and has its strongest effect wide open at f/1.2. I will go into more detail in a future blog entry that will also have some animations, comparing both 56mm lenses at various f-stops.

For now, if you click on the above image, you'll get a gallery of images of my colleague Nicole, all shot handheld at night with my X-E2 and the 56mm APD wide open at f/1.2. Hopefully this will give you a feel for how the lens will perform in some situations and whether or not the "look" is worth the price premium over the regular 56mm. If I was a regular portrait shooter, I would definitely have to strongly consider this lens since I feel it does perform very nicely in that capacity. Some more technical details of how the images were shot are in the gallery's introduction as well.

Finally, this gallery is the first of 2015 and will represent a slightly new look. All previous galleries linked from my blog basically appeared as though on my regular www.sublimephoto.com website, however the sad truth is that I have not updated the gallery link pages on my website since 2009! I am way behind and since I have been posting all my galleries in recent years as links from my blog, I thought it appropriate to have the galleries appear more integral to the blog, with the same banner, links back to the originating blog posting (the -back to post- link you'll see at the top centre of each gallery) and so on. Also there will be a link to allow you to see all galleries posted for the year the gallery you are currently in was posted, for example the "2015 Image Galleries". At some point I do plan on updating my website, but in reality it might all end up being integrated with either this blog, or perhaps even a newly designed one. For now, hopefully this is a slight improvement...

Sunday, January 4, 2015

Bookmark and Share

Gallery: Testing the Fujifilm 50-140mm f/2.8 Zoom


I finally had a chance to really put the new Fujifilm XF 50-140mm f/2.8R LM OIS WR zoom lens through its paces on this past Christmas day. For some weird reason, I had thought the gallery was already posted to my blog, since I had uploaded it shortly after Christmas, but obviously I hadn't - oops! In any case, you've probably already seen my preview blog posting of this lens at this link here, but for that one, I only had the lens briefly and took maybe a dozen shots with it. On the 25th, I took nearly 300 shots and you can see some of the selected images in the gallery you can get to by clicking on the above image. The high-res images are nice and big, 3000 pixels in the long dimension, so you can get a better idea of how good the image quality is on a wider range of shots.

My conclusions hold by and large: the new professional zoom from Fujifilm is spectacularly sharp, focuses very quickly and has effective image stabilization. On my X-E2, with the added Fujifilm handgrip, I actually didn't find it to be unpleasantly heavy, although it is certainly a large lens. Following are some additional comments about this lens, now that I have tested it more thoroughly. 

Thursday, January 1, 2015

Bookmark and Share

Happy New Year! And some images...

The last rays of sunlight fall on Vancouver, on New Year's Eve 2014, shot from the Granville Street Bridge. There is a gallery of images from the beautiful afternoon of December 31st, which you can get to by clicking on the above image, where my first gallery of 2015 shows my very last photos of 2014...

I had used the opportunity to shoot with the new Sony A7 Mark II and most of the images in the gallery were taken with Sony's new Zeiss 16-35mm f/4 OSS, a body and lens I had not yet really had much of a chance to test out yet. I also shot with a few other lenses and the below image of the moon is a 100% crop from Lightroom, showing how impressively sharp Sony's 70-200mm f/4 OSS for the FE mount is. It was also an exceptionally clear evening, which helped too...